 |
||||||||||||||||||||||||||||||||||||||||||||||||||||||||||||||||||||||||||||||||||||||||||||||||||||||||||||||||||||||||||||||||||||||||||||||||||||||||||||||||||||||||||||||||||||||||||||||||||||||||||
DIY Solar EnergyIntroduction:
From
Wikipedia.com -
Solar technologies are broadly characterized as either passive or active
depending on the way they capture, convert and distribute sunlight. Active
solar techniques use photovoltaic panels, pumps, and fans to convert sunlight
into useful outputs. Passive solar techniques include selecting materials
with favorable thermal properties, designing spaces that naturally circulate
air, and referencing the position of a building to the Sun. Active solar
technologies increase the supply of energy and are considered supply side
technologies, while passive solar technologies reduce the need for alternate
resources and are generally considered demand side technologies.
Solar Concentrators and Basic Thermal DynamicsWhen discussing solar power it's good to understand the most basic concept, which is taking a lot of sunlight and putting it into a small place, or "focal point". Think of using a magnifying glass to burn leaves, paper, bugs and little brothers. The magnifying glass is acting as a solar concentrator by focusing all the sunlight that passes though it into a tight beam of energy. There are two principles with are lenses, like the magnifying glass where the sunlight passes though the lens. The other is reflection, where a "mirror-like" object redirects the sunlight into a tight focal point. Thermal dynamics for our discussion is simply how energy in the form of heat affects different objects and how different objects can affect temperatures. Some simple thermal dynamics to always keep in mind: When temperatures increase, so does pressure. An example is working with steam. When the temperature of steam rises, so does its pressure, which means it can produce more power. The same principle is used in cooling, but in reverse. When you lower the pressure of something, you also lower the temperature. This is how refrigeration and air conditioning basically work. Heat rises and cool temperatures sink. If you have a large container of water and want to make steam, you take water from the top of the container. On the other hand, if you want to make ice, you're better off getting the water from the "bottom of the barrel". I'm sure you know this, but keep it in mind. Black absorbs light and heat and white (and shiny metallic) reflect light and heat. If you want something hot, paint it black. If you want something cool, paint it bright white. This is the very basics of most solar energy principals: If you want heat (energy), concentrate sunlight on a black object. And there's many ways to do this, as you'll see below.
The Physics of Reflection:Don't let the word "physics" scare you. These videos discuss the basics of how light is reflected and are actually pretty interesting. And they are a "must" for anyone to really understand how solar reflection works.
Go ahead and check them out, and then we'll move on the the "hands on"
stuff.
Various Examples of "Industrial Strength" Parabolic Solar Mirrors:A parabolic mirror is simply a reflector formed in a shape that will concentrate the light once it's reflected. For our purposes, there is no single shape that makes a parabolic mirror, as you should have seen in the physics videos above. First, let's look at how the big guys are using parabolic mirrors:
Do It Yourself Solar Parabolic Mirror SystemsDIY Satellite dish notes:
Dish Size Notes:
Also, mylar won't hold up well outdoors and you can expect it to last for only a few months before it start to fog and its effectiveness begins to fade. However, it is inexpensive and great for our use. 2m is the preferred thickness for mylar as it's the easiest to work with, as opposed to 1m thick mylar. Here's some other common reflective materials used in parabolic mirrors by Do-It-Yourselfers. These materials are generally of higher quality, but also more expensive. Use these terms to help you get started in your research:
Here's an assortment of videos to help stimulate your thought process. Some are really low tech, others show the possibilities:
Cloning
And this is the main goal of ShySky.com, which is to teach everyone, everywhere about the power of the parabolic mirror. Sure, there may be better technologies now and in the future, however they can not be taught to, or made by people as easily or effectively as the parabolic mirror. Let's look at some of the different methods available that I classify as "cloning"...
Solar Ibex - An innovative engineering in that it is "cut" like a pizza is cut into slices for easy transportation, shipping and packing. Due to copyrights, I can't post a pic here, but check it out:
Here's another example of using slices, but on a larger scale:
Be sure to also check out this "for sale" parabolic cooker. It sells for $199 and it has some great engineering, including slices:
Click "Features". Then click "Folding". This is a n innovative dish. Creating a dish of your own, using "slices" is a great idea, with huge profit potential. You need a single "slice" and you can make a few molds and cast other slices. When making a cast, maybe try to come up with a "lego-like" design, where slices can be snapped in place. Or in a pinch, the good ol' wing nuts will work. Also notice how the bottom slice has a gap for a pole to be placed as a support for the focal point. And the slices are surely easier to paint and/or cover with mylar tape or foil tape, etc. By using the idea of slices, the dish itself could just about fit in a large "deep dish" pizza delivery box. You could get a 24 in. dish to fit in a box that's about 12 in. x 12 in. Can you come up with a material that is:
Cloning Examples:Parabolic shapes are everywhere...The bottoms of cans, glass pot lids, satellite dishes and more are all good shapes that can be copied and used to make more parabolic mirrors. Once you have the shape, it's really a matter of adding reflective material.
Pronounced "fra-nell". A frasnel lens was invented to concentrate light for llighthouses, so the beams could be seen by ships miles off shore. This technology is used in many products, such as the domes that cover an overhead light, in your car's headlights to concentrate their beams and in big screen rear projection TVs. If you ever used a magnifying glass when you were a kid to burn leaves and bugs, and in my case my little brother, this is the same principle used by fresnel lenses, but much more effective. Over-simplifying for our discussion, they are a lens with a bunch of grooves or circles, each creating it's own "magnifier" focus the light in a tight beam.
Now that you've seen the power of a fresnel lens, be sure to watch this video to see how this power can be applied to green energy:
One thing to note in the video above is how he uses solar panels to pre-heat the water. Pre-heating water before converting it to steam is a very powerful method that I haven't seen enough concerning green energy. Pre-heating water is commonly used for boilers and steam powered vessels.
There's different kinds, some are flexible and others are hard and range in price from about 99 cents to $9. Finding the best ones is hit and miss, and can even vary with the same brand name. The magnifying ability is only part of the equation, as the shape of the lens, actually the grooves in the lens is a bigger factor. You may find a 2x magnifier actually produces more heat that a 3x. You can get plenty of these small fresnel lenses at your local OfficeDepot, OfficeMax, etc. Try out a few of varying sizes, prices and flexible and hard lenses. After you've discovered the best ones, stock up on them, they can be used in a multitude of different ways.
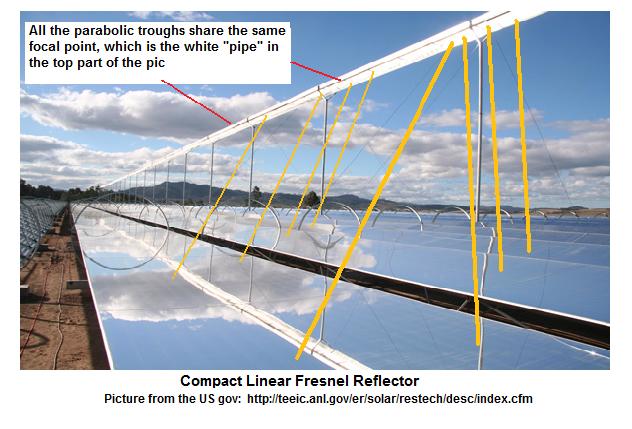
Compact Linear Fresnel ReflectorSimilar in design to a fresnel lens is a fresnel mirror or reflector. Instead of light passing through a lens to be concentrated, the light is reflected by a mirror and focused that way. There's many ways to make a fresnel mirror, but to simplify things they are basically multiple mirrors all focused on the same focal point. The picture below is of a Compact Linear Fresnel Reflector. The reflectors combine elements of both parabolic "troughs" and fresnel effect. The "fresnel" part is how there are multiple troughs at different distances away from each trough. The fresnel mirrors all heat the white "pipe", which is usually filled with an oil or melted salt, which in turn heats steam that powers an electrical generator.
Below are a few videos using the same idea as the Compact Linear Fresnel Reflector above, but on a smaller scale.
In the DIY Tracking Parabolic Solar Concentrating Trough video, you may notice that the troughs are lined up on a N-S line, then they rotate East to West to follow the sun. If you don't want to spend the time and effort tracking the sun, as in the video, you can line up the toughs on a East/West line. This will automatically allow some pretty good tracking. Once every month or two, you will need adjust the angle to match the angle of the sun as it gets higher or lower in the sky, as the seasons change. Also, you can make bigger troughs using more reflection to add more energy to each. And if you can get ahold of some fresnel lenses or parabolic mirrors, you can set up something to preheat the water before it enters the troughs, making the system more effective. You may also want to add some more heat to the pipe just before the last stage, where it is converted to steam. This may add some additional power to the system. You can also try more of a fresnel system, with two troughs pointing at the same pipe. Mount two halves of PVC pipe, one on top of the other, and point both at the same pipe. Be sure to make both use the same focal point, which will be the pipe. When constructing a project like this, you need to consider whether it's better to double the troughs or to get a solar tracker to move all the troughs. And in the example from the DIY Tracking Parabolic Solar Concentrating Trough video, see how all the pipes feed into a single pipe? Try aiming another trough or two at that pipe, making sure you don't set the frame on fire.
Solar Ovens:Below are different design for solar ovens. This is one of the cheapest and easiest methods of using solar power. Creating ovens are a great hobby project and having a contest to see who can boil water in one the fastest is a great idea for any organization. But solar ovens are also more than just a hobby. They save lives. People in developing countries are using them to pasteurize water and cook food. Burning wood to clean water and cook with is a scarce commodity in many areas. Collecting wood is also very time consuming and takes away from a person's time to go to school, have a job and more.
Start with the Engineers Without Borders video, as it shows a lot of various
designs. IMO, engineers tend to over-design and are usually more interested
in making the perfect mousetrap, instead of the cost and ease of
production.
The concept is pretty simple: Reflect as much sunlight as you can into a "black box" and put a lid on it. Think "outside the box"...If you are working with steam, using this simple concept is great for preheating water. In the video above featuring the power of the fresnel lens, a very qualified scientist incorporated preheating water in his steam system. My background, although limited, also taught me the importance of preheating water for steam projects. Every degree the temperature of water is increased before reaching the boiler is one degree less the boiler needs to generate.
How to Make a Solar Air Heater Using Pop Cans and Scalvaged StuffNote: In general, it is far cheaper and more effective to use solar power to heat air instead of water to heat your home. Below are some videos that show how to create you own solar furnace. With some creative scalvaging, you can make one of these for just a few bucks.
Using the videos above for guidance and inspiration, scalvage:
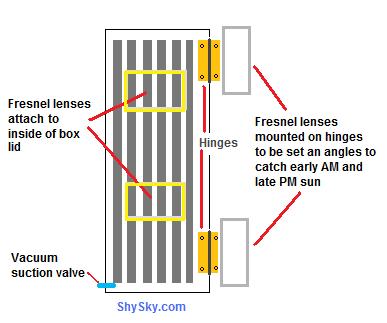
Use the solid door as the base for the project and the glass door as the top. The first thing is, the pop cans probably don't help all that much. I suggest corrugated sheet aluminum metal as your first choice, as it has more surface area to strike than than a flat sheet does and it offers two sides for the air to circulate around, since parts of the sheets are bent a bit. Let's consider: 1. The concept of vacuum expansion tubes - Create the solar air heater basically as shown in the videos, but add a valve that will let you suck out the air to create a vacuum around the pop cans. You can use a bike pump with the suction plunger reversed to create a hand vacuum pump. The "trick" here will be creating a one-way valve that doesn't let air back in after you pump it out. It may be as easy as a tube with a clamp. The other thing is to make sure all the pop can "tubes" are air-tight and don't suck air from your heating tubes, which will ruin the vacuum. 2. Fresnel lenses - Buy a few of the cheap fresnel lenses at your local OfficeMax or Office Depot. Add them to the inside of the glass top so that and adjust the height of the cans so that the fresnel lenses focus the sun on the pop cans. If you don't have a vacuum, the fresnel lenses probably won't do any thing, unless they are to the side of the heater and reflect addition light/heat into the box.
In the diagram to the left, you'll see a (cheesy) mock-up of a combo solar heat furnace and vacuum tube. The colder it is outside, the more effective the vacuum will be. The fresnel lenses are the cheap ones found at any office supply store, mounted in wooden picture frames (try to scalvage). These should be at angles on both sides of the box so they will capture and direct the sunlight to the black corrugated sheet metal in the box. The hinges make it easy to adjust the angle of the lenses as the angle of the sun changes from time to time. You can put the fresnel lenses on both sides of the box. Just make sure not to point one lens at another that may be mounted to the top of the box. Some people use reflection to add more sun to the box...But haven't seen anyone try with the cheap fresnel lenses. Using the design in the first video "My 4th pop can heater" by Rich that places the cans in the downspouts makes it easier to form a good air-tight seal, since you don't have to seal each can individually and only need to worry about the ends of the downspouts and the intakes and outputs...But I'm not sure he even needs to cans to get the same affect.
Build Your Own Solar PanelsHere's a great way to save on solar panels, and that's to assemble them yourself. It's time consuming, but we'll brainstorm ways to maybe speed things up after you check out the videos:
To be honest, assembling solar panels for your own use is really pretty simple and other than the cells themselves, much of the materials for the containers can be scalvaged. It's really just time consuming. If you want to sell them professionally, you'll need to make them look good, but for your own use, a scalvaged glass door and some 1x1s and you're in business. Important Time Saving Tips: You can buy "pre-tabbed" solar cells for a few cents more per cell and save a bunch of time: Google "shopping" search for tabbed solar cells. eBay search for tabbed solar cells.
You can also buy 6x6 solar cells which are twice as big as the "regular"
size. Since you use fewer cells per panel means less
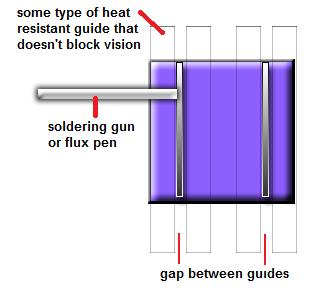
work: Be sure to get Grade A and compare the value per watt of the 6x6 cells with the 3x6 cells to check for the best value. And value isn't just about price, it's also about how much time and energy it saves you. Pre-tabbed cells can be as little as 6cents more. You'll spend more than this on solder, let alone your time and attention. I've haven't found any cells that are 6x6 and pre-tabbed, but will update this if I do. What can we take from the How It's Made video and apply it to making our own panels, using some of the factory production techniques along with they DIY detailed instructions? 0:26 point in video shows how some guides are adding to the work counter to help position the cells in place. This is easy enough to DIY. 0:32 point in video point in video shows adding the flux. Dan and Denise show us how to use a flux pen. Idea: A guide should be created so both the flux pen and soldering iron can be pressed against it. A guide will greatly improve speed, accuracy and quality. Problem: How to create a guide that will stand up to the heat of the soldering iron? We don't want a wood-burning set. This edge must be smooth. Maybe something like two glass edges, separated by a little gap. Or maybe a combo of a carpeter's square on one side and a glass edge on the other, so you can still see. If using something, you need to make sure it doesn't interfere with your view.
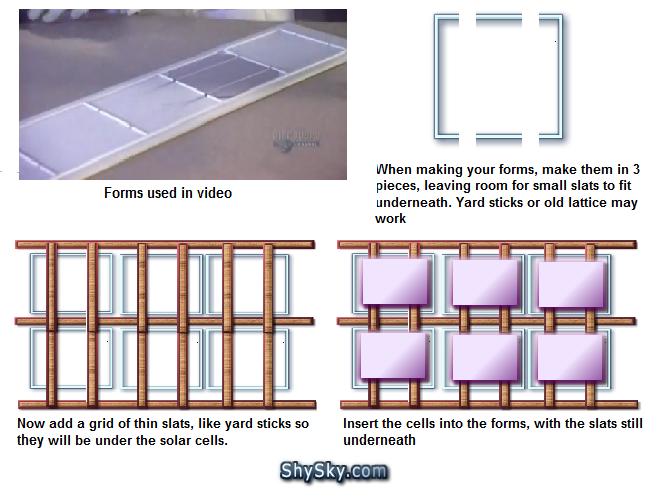
0:32 point in video also shows an easy to make form used to keep the solar cells in place.. 0:55 point in video point in video 60c = 140 f. Cleaning may not be necessary, but it probably improves the efficiency. It's up to you. Instead of ultra sound, use anything that will gently vibrate the water. If you have a vibrating sander, just put it on the table. Or, maybe toss in an old electric toothbrush or add something to the outside of the container to gently vibrate the water. Also, I suggest using distilled water, to make sure no minerals are present in the water the may affect the cleaning. 0:57 point in video - Make your own moulds out of homemade bioplastic to secure. (See the Materials page for more info). 1:04 point in video - Again, having some sort of heat-resistant, smooth edge guide will be a big help. 1:25 point in video - Cover them with a lightweight board covered a thin foam rubber surface, or a long, strong piece of styrofoam, then turn then upside down onto the styrofoam to help reduce the risk of breaking. 1:42 point in video - You may be able to make a vacuum "grabber". I haven't tried this, but:
Again, I haven't tried this in real life, but the solar cells are pretty light and I don't think they need much suction. You may also want to try some peg board, similar to an air hockey table, but instead of blowing, it will be sucking. Plug some holes to get more suction in others. Or, when you make your forms to hold the cells in place, you can make them in parts, leaving room to get a thin wooden support frame beneath them, making sure the "latice" supporting strucure is flush with the moulds so you have a flat surface to prevent breaking when applying pressure from soldering.
1:58 point in video - Note the little "tray" and the end of the cell container. This tray holds the connecting metal strip in place that will be use to connect each string of cells to the other. It probably would be helpful to also add a similar guide to your layout.
The rest of the "How It's Made" video is showing how they encase the cells in some type of protective container. What they do in the video for this is probably out of reach for most people. However, you do have some options. Whatever you use for the top surface, make sure it doesn't filter out any of the sun's rays. Also, make sure if you use glass it is safety glass and doesn't break into chards that could seriously hurt someone...And make sure whatever you use will also hold up to hail. Check it to some plexiglass or acrylic options. Once you find a good surface that you can mount your rows of solar cells, the sides and bottom become easier. You can poor acrylic or epoxy into a form, or even use something like expanding foam insulation. If you try the expanding foam, make sure you use the "roofing" type, as it's made to withstand the elements. The foam is good because it's very protective and it's also very lightweight. Two things to double check:
Can a duplicator multiply your efforts?
Here's the directions on how to build the duplicator in the videos above. With a little adaptation you may be able to make 2, 3 or even more solders at the same time. Why did I spend so much time on making your own panels? Because making solar panels can save you time. Making your own solar panels costs about 1/3 to 1/2 of what it would cost to buy them, so there's a good profit margin built in. And if you can discover a way to make them faster and easier, it could turn into a little business to make you some money. Assuming you can make good, solid solar panels at a price that's as good or better than what's out there, it really comes done to doing some marketing. In other words, don't sit back and wait for customers to come to you, find where your customers are, and go to them. Here's an example: We know Harbor Freight has a good beginner solar panel system, let's see what else they include:
Taken from Harbor Freight's site:
We already know that they sell these kits all day long at $200 each. And, we know from Dan Rojas' videos that the solar cells we're using are better than the ones in the Harbor Freight kit. And we know that the Harbor Freight kit has tons of great reviews online. (Free product research!!!) What they do is make it EASY to get started by including all the basics in one kit. Why can't you do the same? Now take this kit to your local flea market and see if it will sell. Be sure to demonstrate your kit. Also, print out the sales literature and price from the Harbor Freight kit. Explain how your's has twice the wattage for the same price, or whatever positive but factual spin you can place on your own kit. Tell them how it will pay for itself so they aren't really buying, but are SAVING money. The protective casing/enclosure will make or break your ability to go commercial. Looks are everything. So, remember to specialize. For example, see if you can't make a casing from the roofing foam from above. Try saving money by using some packing "peanuts" or recycled styrofoam as filler. Then apply the expanding roof insulator foam to fill out the mold. Basically, what you have at this point if time is a solar panel, protective surface and a bunch of bubbles (styrofoam and expanding foam). Or maybe you can add some hinges to the panels to allow them to fold, making them portable, making sure the wiring isn't damaged in the process. Or, make the panels smaller, but with jacks and wires that make them easy to connect and disconnet. So the question becomes, who really likes light-weight, compact stuff? How about campers, hikers, flyers, boaters and RVers...Come up with some lightweight and portable kits and you have a special niche to market to, a great advantage when marketing. Here's something I came across, and that's a "briefcase full of solar". It was basically a solar panel that folds up into a briefcase. Being "hinge creative", how many solar cells can you fit into a briefcase or backpack? Instead of the typical 4 rows, with 9 cells each, how about 2 rows (18 cells) but add a reflective trough to each side to reflect more sun instead of using more cells? This is a business you can start pretty small, with minimal investment and easily test to see if you can make money. There is serious demand for these products and they are recession proof. Unless people are going to shut off their power, there's no reason not to get "free" electricity. We know you can sell these things, if they work and look good. We know that they only cost about 1/3 of retail price to make. What we don't know is how fast you can make them and if that effort is worth your time or not. Since it really comes down to your time, this is why I spent my time trying to save your's. :)
Again, maybe your specialty is improving the efficiency of already existing solar panels. You can do this using solar trackers/heliostats, adding more light to the panels using reflectors or finding a way to keep them cooler. For example, maybe it's easier and cheaper to move a mirror that reflects light onto the solar panels than to "track" the sun by moving panels themselves.
Heliostats and Solar TrackersWe won't worry about precise definitions, for our purposes heliostats and solar trackers are the same thing. What they do is follow the sun with the objective of keeping a solar device in the optimal alignment for solar collection. Basically, as the sun moves, a solar tracker moves with it. Simply, trackers can either be single or double axis. Single axis trackers follow the sun as it moves from East to West. Double axis trackers also move up and down, as the sun moves higher across the sky in summer and lower in winter, assuming you are in the northern hemisphere. If you're just starting out, concentrate on single axis trackers, and the path of the sun changes constantly during the day. The "up/down" axis of the double axis trackers really only needs to be changed every month or so. Depending on circumstances, some resources say a solar tracker can increase the effectiveness of a solar panel up to 40%. This is a pretty dramatic improvement. Some trackers work by measuring the strength of the sunlight, others use time, some use weight similar to how an hour glass basically works to slowly tip in one way. Here's some examples:
An important business decision to make is whether it's better to pay for a solar tracker or just add 40% more solar collectors.
Heliotrack.com has some good heliostats - solar trackers as well as a DIY
kit
Use some the techniques to make your solar kit more effective. Stuff like solar trackers and using reflective mirrors can add much more power to your offer. You don't have to include them in your base package. Instead, offer them as an "upsell". This is why the help at McDonald's is told to ask if you want fries with that, they are trying to get you to spend more money. Once you're sure you can make a go of it, start looking for things that you can add on to your solar panels. You can even buy 12v marine batteries through Alibaba.com "OEM", which means they will put YOUR name on them.
Put together all the equipment needed for RVs or homes, and people will buy
because of the convenience. Most people don't "do" solar because they don't
know what to do. Show them. Have it already for them. Write up good directions
for putting things together and print them out using your computer. Reducing Your Start Up Costs and Risk Did you know you can buy broken solar cells? And from one of the videos above, we know that you can still get juice from them. I suggest you get some broken solar cells at first to use to set up your assembly line and see if this is a project that will work for you. These broken cells are sometimes called "grab bags" which is a good phrase to know when shopping for broken cells. I don't recommend broken cells after that, unless you know someone that likes putting puzzles together. But if you do like putting puzzles together, why not convert to broken solar cells and consider it a money making hobby? Note: These aren't little bits and pieces, it's just efficient to assemble them in ways that fit your casing best. Here's some more resources to get you going: (BTW, did you notice in the "How It's Made" video that they say they got their parts from China and Europe? You can get your solar cells from China too. Check out Alibaba.com above and you can get your solar cells from the same place everyone else does, without the middle-man markup.)
Check out these DIY kits - Either to see what they are doing that you can do better, or maybe just to build your own kit: Solar Panel Kits - This site had some pretty good deals when I last checked. Harbor Freight 45 watt Solar Panel Kit - Right now, the kit is $199, but if you search online for coupons, I've seen the kit for as low as $149. It's a good starter kit and an effective way to get started with solar panels. Check DealItem.com for coupons and discounts on the Harbor Freight Solar Panel Kit. Note: It's made by Chicago Electric Power, you can also try to find deals using that name, as well.
Inflatable Solar Collectors - New Tech Breakthrough?
Cool Earth's videos and site both claim, "In fact, a single cell in our concentrator generates about 300 to 400 times the electricity of a cell without a concentrator." If this it even partially correct, this is some pretty amazing stuff with huge potential. The tech doesn't seem to be "NASA-ish" and is actually pretty simple. It appears to be basically a parabolic mirror focused on a solar cell.
The "balloon" part is really just to minimize the amount of materials used
and the inflation using air keeps the thin plastic rigid and keeps its shape.
They even say they are using mylar as the reflector. They explain their use
of material here:
Without knowing of any special tech, here's what they have to say: Other than the balloon/inflatable structure, which is a cost cutting strategy (and a great on at that), I can only see two things that may prevent this thing from being engineered by others: 1. Do they use some type of special solar cell that collects the reflected light? On their site, they say they are "concentrating the light onto a single high efficiency cell".
Here's a site that sells "high efficiency" solar cells
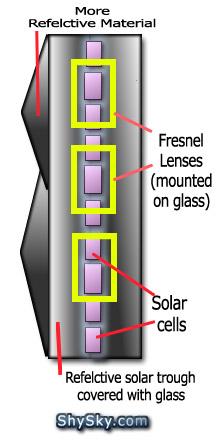
Don't worry about copying the balloon shape. They use that as a way to make the things inexpensive. This is your goal, also. How can you reduce the costs of solar panels? You can do something like like a solar trough (example in pic on left) may work for this. Instead of inserting a pipe in the trough for heating water, maybe try putting some cells in the focal points instead? Or, adding some cheap fresnel lenses and reflective material to a "typical" solar panel could increase the effectiveness where you could only use 1/4 (for example) of the solar cells to get the same power. Since we already know how to get more light on the cells using fresnel lenses, parabolic mirrors, other reflectors, etc., the question really comes down to how to you get as much light as possible on the cells, without them burning, melting or being damaged from the heat? Coming up with a simple and inexpensive way to cool solar cells is a million dollar idea. Here's some possibilities for the experimenters and pioneers: Heat sincks: See Wikipedia for more info on heat sinks. A car cooling system, using car coolant, radiator, water pump, etc. Garden "Misters" - These hook up to a water fawcett and spray a light mist, using evaporative cooling. The probably work better in dry climates, but may also be useful on solar panels that have concentrated light. While they are easy and pretty effective, they also use water. The key here may be to come up with a way to use misters and recycle the water. A refridgerant type cooler that using mini-fridge parts or even a scalvaged electric ice-cream maker. Using rock salt and water is very powerful coolant. Air fans - There's a number of options. The best solution depends of a few factors such as if the panels on a roof or on the ground? If roof-top, weight, wind and access become a bigger issue. The point is, there won't be a perfect fit for all possibilities, which mean MORE opportunities for you. Also, a combination of the suggestions may be best. PAY ATTENTION: There are a number of safety hazzards here. You are working with heat and electricity, both of which can cause fires. And with some types of cooling systems you may even be mixing water and electricity.
Solar Water HeatersIn general, it takes a lot more energy to heat your home using water than air. But many of us still use plenty of hot water...
Solar LightingI'm not convinced solar lighting is the best solution most of the time, but it may be of interest to some. SolaTube - An daytime solar lighting system that refects light from the rooftop to rooms inside. This page has a video that explains the tech behind the concept. A good scalvager should be able to come close to the effectiveness of Solatube using PVC, light covers and reflective materials. The key here is, you really don't want "refelction" but rather "diffusion". Solatube uses "Spectralight Infinity", which they claim the most powerful reflector known, as the reflective material inside the tubes. However, some Highly Reflective White Elastomeric Roof Coating with a little added Titanium dioxide will probably come pretty close and is pretty inexpensive. Here's a couple of DIY videos that will give you some ideas:
More Solar ResourcesA commercial inflatable solar water heater - Check it out for some design inspiration. If you're heating water for steam, this concept can also work as a preheater.
To experiment, you can just use a big carboard box and maybe car headlight lenses and PVC pipe painted with the roof coating (spiked with a little titanium dioxide).
A wide variety of Concentrating Solar Collectors Very Cool, Simple and Power Idea: Here the guy uses mylar in a completely unique way. Instead of gluing it something, he instead just stretches it across some support frames to help it keep it's shape. He then just replaces the mylar about once a year. This technique has many, many advantages, including lost costs, low materials and being lightweight. And if something is lightweight, it's easier to ship as well as turn using solar trackers. My one concern is wind. The design is basically the same as a kite and how do they hold up in a strong wind?
|
|
|||||||||||||||||||||||||||||||||||||||||||||||||||||||||||||||||||||||||||||||||||||||||||||||||||||||||||||||||||||||||||||||||||||||||||||||||||||||||||||||||||||||||||||||||||||||||||||||||||||||||
 Solar energy
refers primarily to the use of solar radiation for practical ends. However,
all renewable energies, other than geothermal and tidal, derive their energy
from the sun.
Solar energy
refers primarily to the use of solar radiation for practical ends. However,
all renewable energies, other than geothermal and tidal, derive their energy
from the sun.
 Let's
brainstorm!
Let's
brainstorm!
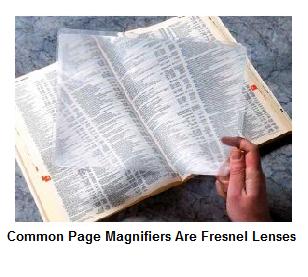 But the lenses above aren't the
only fresnel lenses you can put to use. Those inexpensive page magnifiers,
like the ones on the picture to the left, can also be put to work.
But the lenses above aren't the
only fresnel lenses you can put to use. Those inexpensive page magnifiers,
like the ones on the picture to the left, can also be put to work.
 Solid
door - Or top of computer desk, entertainment center shelves, etc. Use for
base/bottom
Solid
door - Or top of computer desk, entertainment center shelves, etc. Use for
base/bottom
 I haven't seen any "pop can type" solar air heaters use
either concept...But vacuum evacuation and fresnel lenses are both proven
to work, and are very cheap, so these are ideas worth exploring until someone
says they won't work.
I haven't seen any "pop can type" solar air heaters use
either concept...But vacuum evacuation and fresnel lenses are both proven
to work, and are very cheap, so these are ideas worth exploring until someone
says they won't work.
 Don't forget to add a
 At this point, and I haven't experimented
with this, it seems the biggest hurdle is finding a way to concentrate all
that light without blasting the "high efficiency" solar cell to oblivion
from the intense heat generated from a "typical" parabolic mirror.
At this point, and I haven't experimented
with this, it seems the biggest hurdle is finding a way to concentrate all
that light without blasting the "high efficiency" solar cell to oblivion
from the intense heat generated from a "typical" parabolic mirror.