 |
|||||||||||||||||||||
Disasster Survival Tips and InfoIntroduction:
There's an old Jewish saying that tells us "To always have a bag packed", and it's very good advice. The problem is, packed for what? There's many different survival scenarios, each with it's own problems and solutions. We see many different sites giving advice, but it seems a lot of that is either for folks preparing for a military take-over or someone getting lost in the wilderness. There's been a real increase in survival shows on TV in the US. Bear Gryls, Les "Survivor Man" Stroud and Dual Survival are all good shows... But even these shows should really be "Survival Shows for People Too Dumb to Pack a Lighter".
While learning to start a fire in as many different ways as possible is great...What about the rest of us? The ones that wouldn't go out in the woods without a lighter? Why don't they have a show about what they'd put in a fanny pack if they had $25 to spend and were smart enough to think a little bit ahead?
And what type of survival kit is best? This is actually a question without an answer, as there's too many scenarios to come up with one answer. Are you going sailing or ocean kayaking? Are you preparing for an evacuation? Or are you stockpiling for major catastrophe? If you're preparing a survival kit for home use, you should have a small kit that can pack in little bigger pack that can pack in a larger pack. For example, you may have a 1-3 day kit in a fanny pack, that will go into a back pack to last 7-10 days, with the backpack being part of a larger kit you can quickly put in your vehicle in case of an evacuation. I won't get into things that are covered elsewhere, I'll just toss out some suggestions that you can add to your own plans and ideas. I will say, I believe in a roll of foil and a roll handi-wrap. Foil can be used in so many ways: Cloning parabolic dishes, as a "heat" vest, cooking utensils. You can make fishing lures, use it for wiring for electricity and even SOS reflectors. You can use foil to make goggles to protect from snow blindness. Just wrap the foil around your head and cut tiny slits to peer out of. The foil will do a great job of reflecting the light away, protecting your eyes. If you're stuck in the desert, you can make a foil hat, to reflect the sun's heat away from your head, remembering to put small holes at the top and sides to allow for circulation and let hot air escape out the top. With Handi-wrap you can make solar stills, a quick shelter wall by using a couple of poles, wrapping the handi-wrap around them again and again. In emergencies, you can create a "vest" out of foil and wrap handi-wrap, putting a couple of layers of foil around your chest a few times to get a really good heat reflector, then adding a few layers of Handi-Wrap to really trap all that body heat inside. Repeat with your head and limbs, leaving just enough room for your eyes and breathing. Warning: Only use foil if it can also be insulated from the cold, such as under your clothes, hats, gloves, shoes, etc. If it is exposed to the elements it will quickly drain you of body heat. The idea is to trap the body heat and use the foil to reflect it back to you. The next thing I want is a can of Sterno. Make it two or three if I'll be in a cold place. Very few survival tips include any fuel for a fire, and seem to always assume you can find fuel for a fire wherever you'll be. But what if you're stuck in a life boat? Or how about you're in the Artic, with nothing but snow and ice? As I write this, I'm living about 8000 ft above sea-level in the Colorado Rockies. If I go much higher, I'll be above timber line. There's not a lot to burn up there. And people get lost and stuck up there all the time. It happens dozens of time a year in my immediate area alone. Another problem with relying on the surroundings to provide fuel for a fire is that many people, when they are lost, don't know when to hunker down and build a shelter until it's too late, meaning it's already dark and cold. It's counter-intuitive for them NOT to keep looking to find their way back instead of building a fire and shelter. Or maybe you're hiking and break an ankle. Help is on the way, but you'll need to make it through the night and can't walk to get fire wood. Or maybe you've fallen though some ice, got yourself out, but are now facing hypothermia and don't have time to collect wood and build a fire. Or you're in a jungle and it's very damp and need to dry the wood to get it to catch fire.. Sterno will burn for about two hours and is easy to get lit. If you have a pack of survival blankets and a can or two of sterno, you'll likely be able to make it through the night. Even if you have plenty of fire wood, a can of sterno is great for helping it get going. And after Sterno, I'll want some emergency candles. Of course, the "fuel" in the form of sterno and candles is in addition to at least 3 different fire starters. Even lighters won't work in severe wind. Therefore for starting fires, I want a few different lighters, a magnesium fire starter and a parabolic mirror... Basically, give me a few ways to start fire, a few things I can use for fuel (streno and candles) and a roll of foil, a roll of handi-wrap and a packet of 4 emergency mylar blankets, plus a knife/multi-tool, and I have the makings of a good basic mini-survival kit. You can put the candles and a lighter or two in the cardboard roll in the foil and handi-wrap. And don't forget the can of sterno, candles and lighter, plus a pack of emergency mylar blankets for your vehicle, especially if you live in a cold weather climate. Even in the middle of a large city, if you get stuck during a snow storm and your vehicle won't start, it could be hours or longer for a tow truck or other help to arrive. I know first-hand, I used to drive a taxi in Denver and got stuck in a blizzard and had to wait hours for a tow truck to get there. This taught me to NEVER be without emergency candles when driving.
I would have killed for some candles that day. A can of sterno and some emergency
candles can keep you warm for a lot longer than you may think. You can use
the mylar blankets to insulate the vehicle's windows and reflect any heat
back towards you. For emergency food that you can pack and take with you, I always have: Honey - Honey NEVER spoils. As a matter of fact, some archeologist dug up an old Egyptian tomb and found some honey, and it was still edible after a few thousand years. Honey will give an almost instant boost of energy. Also, honey is a great treatment for cuts and can save you from infection, giving it multiple benefits. Peanut butter - High in protein and healthy fats. Also, the perfect food for catching other food, as many animals love peanut butter. Slimfast - It's packed with vitamins and minerals and can be mixed with water. Body Fortress Whey Protein - High in protein and other healthy stuff, can be mixed with water. Vitamins - Should have a bottle of good vitamins ready to go. Dry Milk - Nuff 'said. If I were planning on a day trip, I'd just take a jar or two of the peanut butter, a little honey and vitamins. For an evacuation kit, I'd add the dry milk, Slimfast, and Whey Protein. A little hot or cold water, some dry milk, a scoop of Slimfast, a scoop of Body Fortress, a little bit of peanut butter and honey and you've got a great tasting meal with tons of nutrition. And you'll be hard-pressed to find food with more nutrition that is so compact and ready to go and doesn't take any cooking. Plus, the powdered stuff won't freeze in the trunk of your car and can also take the heat of summer in your trunk.
There's plenty of food storage tips already out on the Web, but thought I'd
share my ideas with you that you probably haven't come across elsewhere. A Major DisasterA lot of the DIY stuff you see here on Sunny Money is great preparedness for a disaster. When times are bad, certain things become very valuable. If you have been scalvaging gas motors from weed whackers, lawn mowers, etc., these all will be worth their weight in gold. If you want to buy a backup generator for emergencies, I strongly suggest spending the extra money and getting one that can use as many different fuels as a possible. Some run on propane, gas, diesel, etc. In a pinch, you want one that is as flexible as can be. Having the supplies to build parabolic mirrors for cooking and distilling water, solar ovens plus solar panels and wind turbines will put you in a position of strength as well as the ability to help others. Knowing how to build and clone solar parabolic dishes could save lives and is so easy to do.
Here's some other general ideas that may be of interest and get your creative
juices flowing: Pop can solar arrayFirst, let's take a look at these two videos, demonstrating solar lighters.
In the videos above we have the first one that shows us a french design, it's similar to a compact make-up mirror used by women. The guide hole is also a nice feature. We'll get back to the design in a minute...
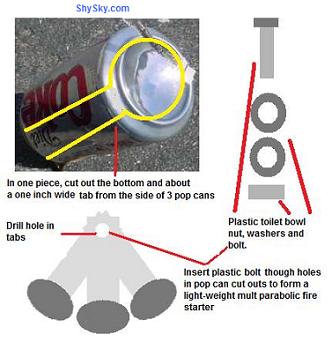
But what if it's a little overcast and you need more power to start a fire? Why not create an array of pop can bottoms using the diagram to the left? In the diagram we're cutting out the bottoms of 3 pop cans, leaving a bit of the side of the can attached to the bottom "mirror" to use as a means of connecting the 3 can bottoms. We're using plastic toilet bowl nuts and bolts because they are super light weight and won't rust, but you can use "regular" nuts and bolts for experimenting. You want to leave enough of the side of the cans so that when you attach them to the plastic bolt there will be enough "stuff" that you can twist and bend them so they have the same focal point, if needed. Or you can aim them at different points of another can to distill or pasteurize water. This is a great little technique to add to an small survival kit...But there's also an idea for making this into a consumer product.
What if you could combine this contraption with the design from the Briquet
Solaire? Basically, you have the same compact case, but it contains 3 lenses
instead of just one.
Each lens also needs to be shaped in a way to share the same focal point with the other two. Now package the array in a case similar to the Briquet Solaire, engineering to allow for two of the disks to rotate on some type of axis, similar to our plastic toilet bolt (but smaller and thinner) and you have an end product fit for the consumer. For those interested in survival only, this is an important concept to know. If you have access to a single pop can, but also have some foil, you can "clone" the bottom of the can using the foil to create an "array" if you need more power to get a fire started. Foil won't be as effective, but it may be the difference on a cloudy day between fire and freezing.
Lifeboat Survival: A Logic ProblemBelow is another of my cheesy diagrams. This time, we're trying to create a distiller that will work in a lifeboat at sea to turn sea water into drinking water. A lifeboat situation is tougher than just about any other when trying to design something using solar power to boil water. Because the boat will be rocking and rolling, twisting, turning and moving, creating a solution needs some real ingenuity. Presently, there are inflatable survival "cones" for sale that are being sold for this purpose. Here's an emergency, inflatable water cone for lifeboats for sail on Alibaba. Here's an inflatable water cone, but it doesn't seem to be for sale at this time and when it is for sale, it costs $200. However, I don't see how they would work if the sea was anything but flat. The just won't work under normal "at sea" conditions.
In the diagram above, I've tried to come up with an idea for a solar distiller than could be used at sea. One thing, a round bottle shape will very likely be better than a flat box shape, since round is better for a moving sun. Actually, the sun isn't moving but the boat will be. Round will help ensure better solar heating in this example. I've also added some pop can bottoms to act as parabolic reflectors. Chances are, they won't be optimal, but while at sea in an emergency situation, every degree of heat that can be added is essential. By adding quite a few of these small parabolic reflectors, we can be sure that one of them is adding some heat as the lifeboat rocks and rolls. However, there's a few design problems that need to be worked out. I don't like using glass. If it breaks, you could be dead. So after more thought, I think I'd use 2 aluminum jars from Venom energy drinks. How to mount the distiller? This isn't an easy task at sea in a lifeboat. But, it should use a suspension system similar to a hammock. There's a reason hammocks were big on ships and boats at one time, and that's because as the boat rocks, the hammocks stay pretty level. So two poles with a wire holding the Venom bottles at each end would be best. But this is something that probably is best done on an individual basis depending on each lifeboat. It could be possible that two oven bags, some flexible PVC pipe and some hose clamps could do the trick, with one oven bag painted black and in direct sunlight and the other oven bag painted white and in the shade (or in a bucket of cool sea water). But I haven't tested this. Or maybe have two metal bowls, one black that holds an oven bag and the other filled with sea water to cool the second bag, both connected using flexible PVC tubing. Cover the black bowl and hot bag with a fresnel lense and point some reflectors/and or foil at the black bowl. To be honest, if you're not injured, there isn't a lot to do at sea and "manning" the distiller can be a good distraction from the dyer situation at hand. Here's another diagram, similar to the one above, except in this case two Venom bottles are enclosed in oven bags. The hot side is in the sun and will use the green house affect plus a fresnel lens. The cold side adds some cool sea water in an over bag to help condense the steam faster. One thing about this design that I don't see in others is the use of copper scrubbers. First, only use copper as it's the safest to use with water. Second, make sure that the copper is pressed as tightly against the side of the bottle that's being heated. The goal is to have the heat passed from the bottle to the copper, so there is more hot surface area to heat the water. So the focus point of the fresnel lens should be where the copper is pressed against the outside of the Venom bottle. Water isn't a great conductor of heat and only the water that's in direct contact with the bottle wall will get most of the heat. If the copper can conduct the heat to more of the water, it will evaporate faster. And in this case, faster may mean the difference between life and death. For a lifeboat distiller kit, I'd be sure to include:
If you do catch a fish, you cook it with foil as a "pan" and a fresnel lens. It sounds like a lot, but it's really not. Most of the stuff is pretty small.
HTI
HydroPack: I'm sure many of you will have no use for a project like this. But, it's one that is a great mental and logistical puzzle intended to stimulate your creative process. If you can make an emergency solar distiller that works at sea, you can make a solar distiller that will work just about anywhere.
And here's some "creative" uses for stuff you may not have thought of:
Be sure to use your Newz Tuel to stay informed
And don't forget to set up your Updatez Tuel to
|
|
||||||||||||||||||||
 Let's
brainstorm:
Let's
brainstorm:
 The second video also
shows how you can start a fire with the polished bottom of a pop can.
The second video also
shows how you can start a fire with the polished bottom of a pop can.
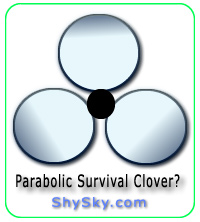 The Parabolic Survival Clover:
The one in front would be the smallest and be stationary. The two behind
would each be a little larger and rotate a little to each side, giving a
"clover" shape.
The Parabolic Survival Clover:
The one in front would be the smallest and be stationary. The two behind
would each be a little larger and rotate a little to each side, giving a
"clover" shape.
